Saturday, December 25, 2010

Merry Christmas!


"The children were nestled, all snug in their beds..."
Sweet dreams, little Gracie. You will be home soon!

Friday, December 24, 2010

Meet Sweet Gracie


She is my Christmas gift from my dear hubby. She is only 5 weeks old today, so we won't get to bring her home until next month. But at least we did get to visit and introduce ourselves. She is a sweetheart, and we are looking forward to bringing her home.

Tuesday, December 21, 2010

Card Swap Time--Female Birthday


I finally felt like doing some crafting again! Tonight is card swap, and this is my female birthday card submission. It is really a very simple card. Two layers that have been punched with border punches, one die cut and embossed butterfly, and a small framed sentiment. The sentiment was done with 2 SU punches. First I punched a 1" circle in the yellow cardstock, then I centered the label punch over it to make a window. The white stamped part is done with the label punch. Actually a super simple card, but I think it is a happy color scheme.

Slice review

I received my Slice machine a couple days ago and have had some time to play. I have to say that I do love it, and it is worth the money that I paid for it ($49.99 at Joanns). It works wonderfully right out of the box (except circles). The glass cutting mat is great too. I love the design cards that I have so far: Basics 1 (comes with the machine), Vintage Findings, & Faith. I have one more, Basics 2, coming soon. The designs are wonderful silhouette type designs, and are not overly cutesy.


However, the Slice will not replace my Cricuts. I love being able to cut larger sizes, large quantities, set up cutting files with my gypsy or DS, and grouping cuts.

Friday, December 17, 2010

New Toy Coming Soon!

I am excited about getting the Making Memories Slice machine on clearance from Joann.com. I hope to have it next week. I also ordered the Faith design card from scrappersmusthaves.com. I have been disappointed with the Christian cuts available to me with my Cricut, and I am hoping that these will be what I am looking for. I have thought of several other ways that I can use the Slice, and can't wait to try it out.

Now to get my crafting table cleared--again--to get ready for the new cutting tool. I think the cuts available will work very well with my Cricut cuts, and I am glad to be feeling excited about crafting again.

Thursday, December 9, 2010

Missing Winnie


I have been absent from crafting as well as posting about it on my blog lately. My beloved Westie, Winnie, has been sick and has gone to doggy heaven. It is a sorrow that I am not likely to get over quickly. She would have been 15 in March, and came to live with us when she was 3 months old. Winnie has been my sidekick and faithful companion for all these years, and I miss her beyond words.


Monday, November 22, 2010

Thanksgiving label/tag challenge


Pam issued a gypsy challenge to make a label or a tag with a Thanksgiving theme. I made the background label with corner shapes from Straight from the Nest, and a small rectangle from Gypsy Wanderings to fill the center. The turkey is from A Child's Year, and the pumpkin is from the Disney Happily Ever After cartridge. I used an autumn stamp from Inkadinkado, and a small brad to hold the raffia bow in place.
I have not decided if this is going to live on a card or a gift box yet, but I wanted to share my project.

Sunday, November 14, 2010

Furever Friends


Sheila's challenge yesterday was to make a simple weld and shadow title for a card or layout. I couldn't decide which color I liked better, so I made both! The "Furever Friends" title was made from the font on Nursery Rhymes. The spotted paper is from DCWV Pet Stack, with some coordinating solids from my stash. I also used the EK Success Pawprint punch. The stamp is a really old one from before they started printing info on them. I also added a little bow with brown/blue or brown/green to the stamped image. Another great challenge, Sheila!

Friday, November 12, 2010

Snowman Card Variations


Here are a couple more variations of snowman cards. I love this stamp set by Sandy Gore Evans. I think they look cute in both traditional and non-traditional color schemes.


The scalloped oval was cut from Storybook, and the background was embossed with my cuttlebug snowflake folder. I also individually hand punched the eyelet holes in the scalloped ovals. That is why I only made three of these cards, too! LOL


Tuesday, November 9, 2010

Linen Closet Challenge


Another card from my Linen Closet stack scraps. The angler stamp is from an old SU set, and it and the sentiment have been heat embossed. The fish was cut from Camp Out, and inked with a pigment ink to make it stand out more. Another fast and easy card!

Monday, November 8, 2010

Christmas Snowflake Card


I had a few card blanks left from the card swap set, so I made a few of these quick cards with it. The printed paper is from last year's DCWV Christmas stack. The snowflake is from Winter Lace, and it has a stamped face from Peachy Keen stamps. It was super fast and easy to make this card! I may go back and give the snowflake rosy cheeks. I didn't think of it at the time it was completed.

Sunday, November 7, 2010

Christmas Wreath Card


Sorry about the glare on the background paper. This is a 4.25" square card, and the printed background paper is part of my scraps from the Linen Closet stack. I never thought I would make a Christmas card from that stack, but I do like it! I used the SU ticket punch on the corners. The wreath is cut at almost 3.5" from Joys of the Season. The leaves were stickled to make the medium sage cardstock blend in with the background paper. The berries were punched from a sheet of glitter paper from last year's Indian Summer mat stack. A small gold bow was added to finish the wreath.

Saturday, November 6, 2010

Shaker Card


It's Saturday, and that means Sheila has a gypsy tutorial to help us learn a new technique! This week we learned to make a shaker card. Mine has a winter theme.

My card base was cut from Gypsy Wanderings, and so were my brown and red print layers. The winter church and pine trees are from Christmas solutions cartridge, and the deer are from the Wildlife Lite cartridge. It is hard to see, but the church has been colored a light blue with star dust stickles used for the glittering snow.

My shaker pieces are cut with an EK Success star punch from silver metallic paper. I think I am going to go back and add some spots to the fawns, even though they technically do not have their spots by winter. I just think it would be cute! LOL

Wednesday, November 3, 2010

Card Swap Time


This is my November swap card for stamp club. It is a 4.25" square card that has a 3-layer snowflake embellishment on the top center. The bottom layer is a scalloped circle hand punch, and the snowflake layers are cut from Speaking of Winter. The "overhang" is small enough that it will still easily fit in an A2 envelope. The sentiment is stamped on a label from the Heritage cartridge. The colors are better in real life.

Tuesday, November 2, 2010

Gypsy Large Window Card Challenge


Finally had time to get back into my cardmaking! This card is for a gypsy challenge on the Cricut mb, as well as for the tutorial on She's a Sassy Lady's blog. The shaped window card is a bread tag shape from Fabulous Finds, the snowman and sentiment are from Winter Frolic, and the snowflakes are from When It's Cold Outside.
The specifics of the challenge were met as follows:
2 pieces of art -- snowman, snowflakes
1 word -- sentiment
1 weld -- 2 bread tags welded, and all the pieces in the window opening are welded
1 stretch -- sentiment
1 turn or slant -- snowman was slightly skewed to the right.
I also added stardust and icicle stickles to the sentiment and snowflakes. The background paper is from K & Co. Another fun challenge from Sheila!

Sunday, October 24, 2010

Retirement Card


I made this sweet little House Mouse card to celebrate Linda's retirement. She is a member of the Cricut MB. There is nothing really fancy about the card. The light green background is embossed with the Diamonds in the Rough Cuttlebug folder. The stamped image is colored with Bic Marks a Lot markers and prisma watercolor pencils. It is double matted, and has 3 eyelets at the top and a little lime green bow added to the sunflower stem.
Happy retirement, Linda!

Wednesday, October 20, 2010

Winter or Christmas card


This is the same layout as yesterday's post. The stamped image in the center is a Penny Black stamp. I think this is a fun stamped image.

Tuesday, October 19, 2010

Any Occasion


Okay, another girly card. I can't help it. I made the matted window with my gypsy and the Lacy Labels cartridge. The stamp is Botanical Script by Inkadinkadoo. It was stamped with a plum pigment ink, then I lightly stained over it with Tim Holtz tea stain distress ink pad. It picked up the plum color ink and the 2 colors are swirled together. Looks really cool up close. The small butterfly is a hand punch--I think by Martha Stewart.

Monday, October 18, 2010

Get Well card


This apple core was cut with the Preserves cricut cartridge. I used a Fiskars border punch on the stamped strip. The sentiment stamp is from SU. I was thinking "an apple a day" for this get well card. I think it is a nice card, but I should try it in more masculine colors.

Sunday, October 17, 2010

Get Well Soon


I have set a personal challenge for myself to use up the Linen Closet paper that I have left from my MILs birthday scrapbook. It was the 8 x 8 stack, so it is perfect for cards. This is the first card from this challenge. The sweet little bunny image has been embossed with a gray-blue pigment ink with clear embossing powder. The floral border punch is from the Martha Stewart line.

Saturday, October 16, 2010

Christmas--Cardinal in Tree


I am so pleased with this card. It started out as a completely different idea. Once I embossed the snowy frame with my Cuttlebug, I wondered what it would look like to have a pine tree coming onto the crisp, white card. Then, of course, there had to be a cardinal in the tree! LOL
The pine branches were made with a Martha Stewart punch, and the little cardinal is from the 50 States cartridge. And the embossing was glittered with Star Dust stickles.

Friday, October 15, 2010

Happy Birthday Window Card


Sheila, from She's a Sassy Lady blog, had a play along tutorial for making a window card. This is my first attempt at this type of card. I did make a boo-boo and didn't notice that happy & birthday were 2 separate words. Would be better if they were welded together, and touching more of the frame along the edges. I did learn something there! But this card is still usable, and that is what counts!
Thanks, Sheila, for a wonderful challenge!

Thursday, October 14, 2010

Gypsy Challenge--Layering


This is my entry for the SassyLady's gypsy challenge--due today! Yikes! Just in time!
The apple is cut from Preserves. Now that I am looking at the photo, I am not happy with the way the embossed green apples look along the right side. But, I will fix that later. The apple embossing folder is from QuicKutz. The stamped sentiment is from the dollar bins at Target.

Snowflakes with Personality


I think these snowflakes are cut from Speaking of Winter. Their happy little faces are Peachy Keen stamps. I had the idea to give the snowman faces to snowflakes and I am happy with the way they turned out. I gave them rosy cheeks with pink chalk, and outlined the edges with stickles. These cute little flakes ended up on cards.

Wednesday, October 13, 2010

Gift card box


Last year I made this gift card box with Tags, Bags, Boxes & More. It is a great Cricut cartridge. The snowflake with the stamped image is actually not a snowflake at all. It is a four-point decorative label from Storybook. I just cut two of them and layered them to look like a snowflake. The small snowflakes are die cuts from my Cuttlebug.
It was a very simple project, but it was nice to have a box the exact size I needed without having to go to the store to find it!

Tuesday, October 12, 2010

Altered notebook


A simple little project. I believe the stamp is from SU--it also had children making a snow angel in this set. The snowflakes are Cuttlebug die cuts.

Monday, October 11, 2010

Snowmen cards


One of my Christmas cards from last year. I love these happy little snowmen. The scalloped oval was cut with Storybook and the threading eyelets were hand punched. Background paper was embossed with a snowflake Cuttlebug folder and highlighted with my SU white craft ink pad.


This second one is from the same snowman set. I chose not to thread skinny ribbon thru this one. The stamps were purchased as an unmounted sheet so long ago. I wish I could remember the designer's name. It's in my head, it's just not coming to me right now.


Saturday, October 9, 2010

Christmas tags


These are gift tags that I made for nieces and nephews. When completed, a gold braid was added so that they could use them as ornaments after the packages were opened.
The sled was cut from Speaking of Winter, and the gingerbread people were cut from Paper Doll Dress Ups. The "ric rac" trim was cut from Plantin Schoolbook and stickled to make it look like frosting. The little red hearts were also stickled to make them look like cinnamon hearts. The pine branches on the sled are from a Martha Stewart punch. The sled was also embossed with my Cuttlebug and the Distressed Stripe folder.

Friday, October 8, 2010

Miss you card


This card and matching envie were done with House Mouse and Happy Hoppers stamps. I cut around the bunny and popped him to make him stand out from the background. The card is completely colored with watercolor pencils, and has a very soft look to it. The sentiment is also stamped.

Thursday, October 7, 2010

Gypsy sketch card


Here is my loose interpretation of the gypsy sketch on She's a Sassy Lady's blog last Saturday. Since I am not a scrapbooker, I had to downsize the sketch meant for a 12" x 12" page layout. I subbed a stamped image for one of the photos, and had to leave the other one out due to a lack of space. I used the scarecrow from SUs retired Happy Fall set. The background for the image is from Old West. The fence is from Paper Doll Dress Ups, pumpkins are from Create a Critter, and the sentiment is cut from Just Because Cards & Straight from the Nest.

Springtime card


This is another Penny Black stamp--Tulip Jungle. I colored this image with watercolor pencils, and Bic Mark It markers. The image circle and green scalloped circle were cut with Nestabilities, and the card and envelope were cut with the Wild Card cartridge. The pink card matches the image even though it looks off in the photo.

Wednesday, October 6, 2010

Thank You House Mouse card


Since I love to sew, I just had to have this sweet little House Mouse stamp. It has a matching sentiment stamp that says, "Thank you sew much." It is embellished with a button and some raffia, and colored with prisma watercolor pencils. Very simple card, but I love it! Hope you do, too!

Tuesday, October 5, 2010

Penny Black Hedgie birthday card


I just love the Penny Black critter stamps! This one is from the acrylic valentine's set, and is colored with prisma watercolor pencils. The card is a 4.25" square, and the scalloped circle was cut with Nestabilities. I inked the edges of the scallop with a few of the pastel colors from the dotted background paper. The envie was cut from Wild Card on my cricut. A few pastel dew drops were added near the sentiment to compliment the dotted paper. My little niece loved this card--and the cash that was included inside! LOL


Monday, October 4, 2010

Herd you Mooved card


A dear friend of mine has mooved from her home to a condo--so, of course, I had to make a card for the occasion! The cows are from Paper Doll Dress Ups, grass and fence are from Pooh & Friends, "herd you" is welded and cut from Nursery Rhymes, and "mooved" is welded and cut from Botanicals. The lettering was glittered with fruit punch and yellow stickles. The clouds were free hand cut stencils made to look like cow spots and colored with a SU white craft pad.
This was such a fun card to make, and my friend just loved it!

Sunday, October 3, 2010

Bunny Get Well Card


This is a sweet little Penny Black stamp that I use for many occasions. The image was stamped onto a scalloped square cut from Storybook. The pink flower in the corner is cut from an EK Success daisy punch. I use this punch a lot! It's center is a pink dew drop, and clear dew drops are adhered to the corners of the white scalloped square. The stamp has also been used on the front of the envie. "Get well soon" has been cut from Calligraphy, and then stickled to make it stand out.

The second picture shows the inside of the card. It is stamped with SU's curvy verses and a couple more daisy punched flowers have been added.

Saturday, October 2, 2010

Chickadee Card


I think this is a cheery little card. The chickadee stamp is by Penny Black, and has been colored in with prisma watercolor pencils. The "hello" was cut from Wild Card, and the die cut flower and leaf were cut with EK Success punches.

Friday, October 1, 2010

Floral Card


This card opens as a gate fold. The stamped panel in the front has enough weight to keep the card closed. The agapanthus stamp is from Stampendous. I really love the way it picks up darker and lighter tones from one inking. The stamped panel & its shadow were cut from Just Because Cards, and a prisma flower and a few dew drops were added. Photo frames were also added to the corners of the card.
The photo does not do the paper colors any justice. It is a pretty sage green with tan undertones. I think this card would be a great "any occasion" card.

Thursday, September 30, 2010

Fall Thank You card


I was looking for a candy corn cut on my Cricut cartridges and could not find one, so I made my own with George & Basic Shapes. I am happy with it, but I need to redesign it with my gypsy so that I can resize it easier with the group feature. Maybe I will see about that today.
Anyway, this is a simple little card with an embossed "thanks" square. The ribbon is from the $1 bins at Target, and the printed paper is from DCWV fall stack--2009, I think.

Wednesday, September 29, 2010

Fall Birthday


Here is a fall birthday card made with both Cricut and Cuttlebug. "Happy Birthday" is cut with Opposites Attract. I need to use this font more often. The pumpkins are from Pooh & Friends, and I think the leaves are too.
The orange square with embossed pumpkins is done with a cuttlebug folder and highlighted with orange ink.
I just love plaid for fall cards. I wish I could have a mat stack full of fall plaids. They are the first to get used up from my paper stash.

Tuesday, September 28, 2010

Pumpkin Card


I love these pumpkins. They are Sizzix sizzlit dies, and I think they are my favorite pumpkins. I did some shading on them with Prisma watercolor pencils to highlight the sections. The sign is a Sizzix originals die and I added some texture to it with an embossing folder. The "thank you" was cut with decorative edge scissors. This card was made a few years ago when I only had my cuttlebug. I think it is fun to have a look at how my cards have progressed as I have learned new techniques and acquired more tools.

Monday, September 27, 2010

Autumn Card


This card is mostly cuttlebug. I love embossing folders, and have used Autumn Type and the Maple Leaf die/emboss set (both by cuttlebug). The maple leaf has been pop dotted. The Autumn bookplate is made with a piece of ribbon and Fabulous Finds, and attached with copper colored brads. All of the embossing has been highlighted with ink, and some of the dots on the Autumn Type folder have copper color dimensional paints on them.

Sunday, September 26, 2010

Turkey shaped card


Yesterday's Gypsy Made Simple tutorial was to play along and make a shaped turkey card. This is my interpretation of the lil turkey. He is cut from Create a Critter, and the font is from Botanicals. A bit of stickles (Fruit Punch) was added to the rust color to bling him up a bit for the holiday.
He was a lot of fun to make with the hardest part being deciding on the paper. I think he is adorable, and may make more of them. They would also be cute done as free standing table decorations, don't ya think?
As an added bonus, I also learned to use the multi-cut feature on my gypsy since the pumpkin color (tail feathers) was very thick cardstock.

Saturday, September 25, 2010

Gypsy Challenge due Oct. 1, 2010


This is my entry for the new gypsy challenge. We were to make a holiday card, and since my sister's birthday is on Halloween, I was also able to get her card made while participating in the challenge! Yay!
Challenge requirements: Two pieces of art, min. of 1 word, min. of 1 weld, 1 squeeze, 1 stretch, & min. of 3 cartridges.
Cartridges used:
Jasmine -- "thday" (welded)
Just Because Cards -- "happy"
PDDU -- Ghost & tombstone (squeezed/stretched)
Pooh & Friends -- grass
Storybook -- orange printed background paper
Walk in My Garden -- sign
Wild Card -- "Boo"
I used Tim Holtz distress stamp pad to do some shading on the tombstone, as well as the background shape. I used a Sharpie to highlight the ghost and tombstone, too. The sign is from WIMG, and I just snipped off the post part of it. It is hard to see, but the 3 dew drops on the bottom right corner are amber and purple.
I have to say that I love designing on my gypsy!

Christmas with Penny Black Hedgies


This card was done at the same time as the snowman border card. This stamp (Jingle all the Way) is by Penny Black, and it is a long border stamp. I used it last year to stamp Christmas gift boxes that were cut from Tags, Bags, Boxes & More. Coloring is minimal with just a bit of red and green, and a bit of color for the hedgies to bring them to life. It was stamped with SU basic grey. The Martha Stewart snowflake border punch was used, and a shiny jingle bell was cut from Joys of the Season and a small green bow was added at the top of the bell. I think it is a nice, simple, happy little card. East to mass produce for your Christmas card list!

Friday, September 24, 2010

Winter Card


This is a very simple card. The background paper is from last year's DCWV Christmas stack. I cut strips of white cardstock, stamped the SU snowman border, and used the Martha Stewart snowflake border punch. The coloring was done with Prisma watercolor pencils.
The snowflake die cuts are pop dotted. The larger snowflake is a Sizzix sizzlit die and the smaller one is a Cuttlebug die.

Thursday, September 23, 2010

Fall Pumpkin card


Life has gotten in the way of my crafting lately. This is a shaped card. It was intended for the gypsy challenge due today, but I forgot one of the requirements.

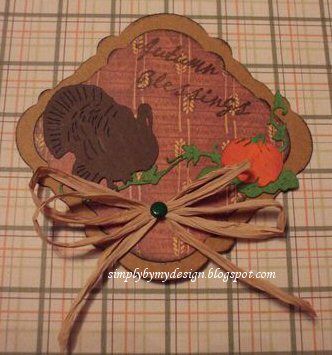
The pumpkin is from Create a Critter (cut at 4"). I used the shadow feature pumpkin for the card base, and the regular feature for the top and inside. This was a mistake since the shadow feature is a bit larger than the regular one, but that is what happens when you are designing at midnight! LOL


The inside was cut a bit short on purpose to show a border around the shape, and the acorn/leaf stamp is from Inkadinkado (clear fall stamp set).

There are several welds: card base, both sets of wording, and the 2 separate leaf/swirlies. I don't know if swirlies is a word, but I like it! Lettering is from Nursery Rhymes. Happy is cut at a height of 1.22, and Fall has been stretched to 1.32. The leaf is from Tie the Knot and had a second cut with it, which has been hidden. The swirlie is also from Tie the Knot, and has been welded to the leaf. The piece was then smooshed horizontally to keep the right height, but make it fit on the card the way I wanted it. One of the leaf/acorn pieces was flipped horizontally, too. After glueing to the card, the lettering was stickled--fruit punch on "happy", and stardust on "fall." A little raffia bow seemed to be the last thing the card needed.

It was fun 'almost' participating in the challenge. I forgot the window. If only.....oh well, no more midnight designing without checking the rules!

**Edit** Good news! The sweet SassyLady that started this challenge allowed me to post my card to the challenge even tho I forgot my window! What a peach! Maybe I will get extra credit for the flip and hide contour! LOL

Saturday, September 18, 2010

Gypsy Box


SassyLady from the Cricut MB had a tutorial today on how to make a box with your gypsy. This is my first attempt at a 3" box with lid. I used the apple cutout (from A Child's Year) to make a small gift card.
Thanks, Sheila, for the great tutorial!